If you’ve been noticing the chrome details on your car, and you’re no longer a fan of the shiny, reflective look, you might be wondering how to delete chrome on a car. In this blog post, we’ll walk you through the steps to delete chrome on a car, discuss the benefits of a chrome delete, and help you decide between a DIY chrome delete versus professional chrome delete services.
What is Chrome Delete?
Chrome delete modifies a vehicle’s look by eliminating or covering its original bright chrome details, such as trim and accents, often found on car grills, door handles, side mirrors, window trim, and more.
While chrome is a traditional look that many car manufacturers use, it can sometimes seem outdated or out of place, especially if you’re aiming for a more modern and sleek appearance. Chrome delete allows car owners to either completely remove or hide these chrome details using wraps, paint, or vinyl.
A popular choice for chrome delete is using a chrome delete wrap, typically made from high-quality vinyl, which is applied to the vehicle’s chrome parts. The vinyl can come in different finishes, including matte, gloss, satin, or even black.
Benefits of Chrome Delete
Before we dive into the steps of how to delete chrome on a car, let’s first explore the benefits of chrome delete.
- Improved Aesthetics: Car owners often choose chrome delete for their car for its visual impact. Removing chrome trim can help them create a more modern and minimalist style, which complements sporty and luxury vehicles well.
- Enhanced Customization: Chrome delete for cars allows you to customize your vehicle’s appearance without requiring permanent modifications. By choosing a chrome delete wrap, you can easily change the color or finish later, giving you more freedom in personalizing your car.
- Protection of Original Chrome: If you want to preserve the chrome parts of your car while still changing its look, a chrome delete wrap is the perfect solution. It forms a protective layer that preserves the chrome underneath.
- Increased Resale Value: Vehicles with a neat and contemporary design tend to have better resale value. Chrome delete updates a vehicle’s look, making it more appealing to a wider range of potential buyers who favor a contemporary style.
- Easier to Maintain: Chrome parts tend to show scratches and blemishes easily. When you perform a chrome delete on a car, it can be easier to maintain, especially if you choose a matte or satin finish, which can help hide imperfections.
- Cost-Effective: Chrome delete is often less expensive than repainting the chrome or replacing it entirely. Using chrome delete vinyl is a relatively affordable option for those looking for a quick upgrade.
How to Delete Chrome on a Car?
If you’ve decided that you want to delete chrome on a car, here’s how you can do it step by step.
Gather All Required Materials
Before you start, make sure you have all the necessary materials for chrome delete on a car. Here’s a list of what you’ll require for a DIY chrome delete:
- Chrome delete vinyl (choose your preferred finish: matte, gloss, satin, etc.)
- Squeegee
- Heat gun or hairdryer
- Razor blade or utility knife
- Isopropyl alcohol (to clean surfaces)
- Microfiber cloth
- A measuring tape or ruler
- Masking tape
Get the Vehicle Ready
The first step in a successful chrome delete is preparing your vehicle with a thorough wash, followed by complete drying. Cleanliness is crucial for the vinyl to adhere correctly; any dirt or grease present can compromise the bond, leading to bubbles or peeling over time. Once the car is clean and dry, use isopropyl alcohol to wipe the chrome surfaces you’ll be working on, eliminating any remaining oils or residues.
Map Out Your Design
Before you start applying the vinyl, it’s essential to map out the design you want to create. Decide which chrome accents you want to cover, and make sure you measure and mark the areas accurately. This step will help prevent any mistakes during the application process.
Cut the Vinyl Tape to Size
With your design finalized, the next step is to cut the chrome delete vinyl to the necessary dimensions. Carefully measure each chrome section and cut your vinyl accordingly, leaving a little extra material that extends beyond the edges. This extra margin will give you room to make adjustments during the application.
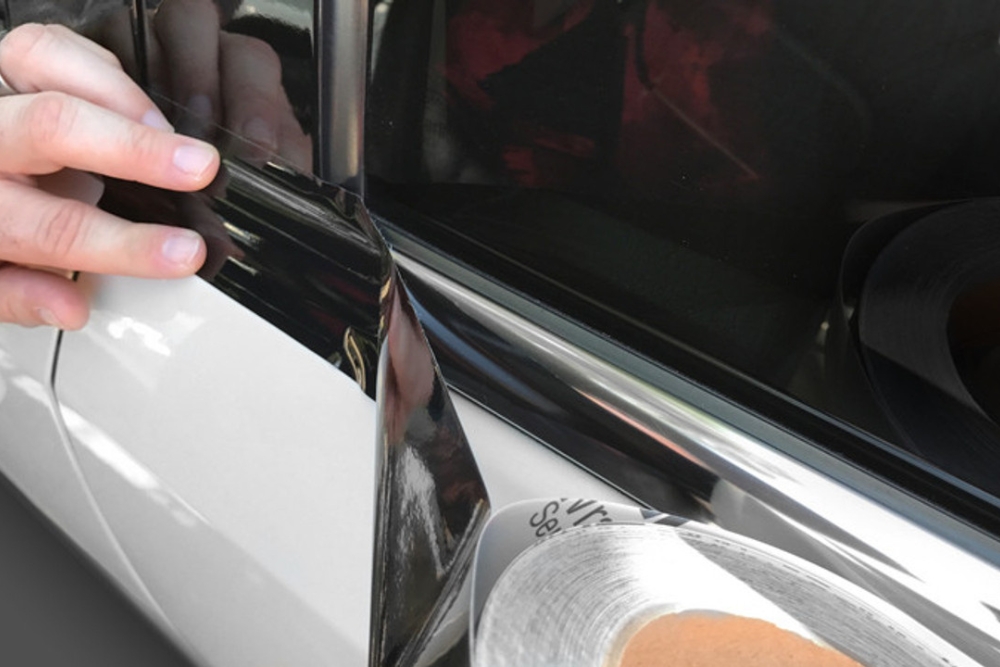
Apply the Vinyl Tape Carefully
Carefully separate the backing paper from the adhesive on the vinyl, starting at one edge of the chrome trim. Carefully position the vinyl onto the trim, ensuring precise alignment with your intended design. Then, using a squeegee, firmly press down on the vinyl, smoothing it out as you go. For a bubble-free application, start pressing the vinyl down in the center of the chrome and gradually extend the pressure outward to the edges.
Smooth Out Any Bubbles or Wrinkles
Remember that it’s okay if you see air bubbles or wrinkles. You can use a heat gun or a hairdryer to soften the vinyl, which will make it easier to smooth out. If you see air bubbles, carefully apply pressure with a squeegee or your fingertips, working the air outwards until it escapes the edge of the vinyl. Take your time with this step to achieve a smooth and flawless result.
Trim Away the Excess Tape
Once you’ve smoothed the vinyl and it’s firmly in place, use a razor blade or utility knife to trim away the excess vinyl carefully. Make sure you trim it close to the edges for a clean, seamless look.
Repeat for the Remaining Sections
Now that you’ve completed one section, repeat the process for the remaining chrome accents on your vehicle. For the best outcome, dedicate sufficient time and apply each section with precision.
DIY Chrome Delete vs. Professional Services
While a DIY chrome delete can be a fun and rewarding project, it may not provide the desired level of precision. Some car owners prefer to leave this task to professionals who have the right tools and expertise to complete the job efficiently.
- DIY Chrome Delete: The main benefits of doing a DIY chrome delete are cost savings and the satisfaction of completing the task yourself. However, it requires patience and precision. If you’ve never applied vinyl before, it may take some practice to achieve the look you want. Additionally, if the vinyl isn’t applied correctly, it can result in bubbles or peeling over time.
- Professional Chrome Delete: If you’re looking for a flawless finish and don’t want to deal with the potential stress of a DIY project, a professional chrome delete might be the right option for you. A professional will ensure that the vinyl is applied evenly and without issues, giving you peace of mind knowing the job is done correctly.
Final Words On Car Chrome Delete
With a chrome delete wrap, you can achieve a sleek and modern appearance that suits your style. Beyond the visual transformation, chrome delete can also offer practical benefits, such as protecting the underlying chrome and potentially enhancing your car’s appeal to future buyers.
If you’re looking for a professional chrome delete service, check out Tint Shoppe Car Window Tinting in Woodbridge.
FAQs
How much does Chrome delete cost on a car?
The cost of a car chrome delete can vary depending on the vehicle and the method used. To find out more about the exact cost, call us at (703) 491-8300.
Does Chrome delete decrease car value?
Car chrome delete typically does not decrease a car's value. In fact, it can make a car appear more modern, which may appeal to certain buyers.
Why do people delete Chrome on cars?
People delete chrome on cars for aesthetic reasons, to achieve a sleeker, more modern look, or to personalize their vehicles.
What happens if I remove chrome?
If you remove the chrome from your car, you can either replace it with a different material or simply cover it with vinyl for a new look.
Can I do my own chrome delete?
Yes, you can perform a DIY car chrome delete using vinyl wraps. Just make sure to follow the proper steps and tools for the best results. However, professional chrome delete is highly recommended.
Is chrome on cars out of style?
Chrome accents on cars are becoming less popular, giving way to more minimalist and matte finishes, although this still depends on personal preference and car style.